Quick Answer
Painting Lexan RC Car Bodies: What You Need to Know Right Away
Painting Lexan RC car bodies requires painting from the inside out — you apply color to the interior surface of the shell and view it through the polycarbonate. This is the single most important fact to understand before you pick up an airbrush or rattle can. Getting this wrong means wasted paint, reversed layers, and a body that looks muddy under sunlight. The correct sequence is: details and outlines first, base colors second, backing coat last.
An airbrush delivers the cleanest, most professional results for Lexan bodies — bar none. While spray cans work for beginners, an airbrush gives you precision masking fade lines, candy effects, and gradient transitions that are simply impossible with rattle cans. If you plan to paint more than two or three bodies in your RC hobby life, investing in a dual-action airbrush will pay off immediately.
This guide covers every step: surface prep, paint selection, airbrush technique, masking strategy, layering order, common mistakes, and finishing. Whether you are a first-timer or an experienced painter refining your craft, there is something actionable here for you.
Why Lexan (Polycarbonate) Demands a Different Painting Approach
Lexan is a brand name for polycarbonate plastic. RC car bodies — especially 1/10 and 1/8 scale touring car, buggy, and truck shells — are almost universally made from it because of its extraordinary impact resistance. A Lexan shell can absorb a rollover at full speed without cracking. However, its chemical properties create real challenges for painters.
Solvent Sensitivity
Standard hobby enamels, lacquers, and most solvent-based paints will chemically attack polycarbonate. They cause crazing — a network of fine surface cracks that look like frosted glass. Once crazing starts, the shell is ruined. Only purpose-formulated polycarbonate paints should ever touch the inside of a Lexan body. Brands like Tamiya PS series, Parma Faskolor, Pactra Lexan, and Createx airbrush paints (with the right reducer) are safe choices.
Inside-Out Painting Logic
Because the outer surface is the "display" side and the paint goes on the inside, every layer you apply is viewed in reverse. Think of it like painting on glass and viewing from the other side. This means:
- Fine details, panel lines, and outlines are applied first (they end up on top visually)
- Primary colors and graphics come next
- The backing or base coat is applied last and is the final color layer
- White backing coat is often applied over everything to maximize color vibrancy
If you forget this and paint a dark base first, your carefully airbrushed detail work will be completely invisible — buried under opaque color.
Flex and Durability Requirements
Lexan flexes during crashes. Rigid paint layers will chip, flake, or crack at flex points. Polycarbonate-specific paints are formulated to flex with the shell. Even when using an airbrush with Createx or similar acrylic paints not originally designed for Lexan, always test flex resistance on a scrap piece first. A paint film that passes a 90-degree bend test without cracking is suitable for RC use.
Choosing the Right Paint: Spray Can vs. Airbrush vs. Brush
Not all application methods are equal. The table below compares the three main approaches across the criteria that matter most to RC painters:
| Method |
Cost to Start |
Detail Level |
Gradient/Fade |
Consistency |
Best For |
| Rattle Can (Spray) |
$5–$15/can |
Low |
Difficult |
Moderate |
Beginners, solid colors |
| Airbrush |
$60–$200+ setup |
Very High |
Excellent |
High |
All skill levels, show bodies |
| Hand Brush |
$2–$10 |
Low |
Poor |
Low |
Touch-ups only |
Comparison of painting methods for Lexan RC car bodies
The airbrush is the clear winner for anyone who takes body painting seriously. A basic gravity-feed dual-action airbrush from Iwata, Badger, or even entry-level Harder & Steenbeck clones will outperform the finest rattle can on detail work every single time. The upfront cost of roughly $60–$120 for a starter airbrush and small compressor is offset within just a few bodies when compared to buying multiple specialty spray cans per project.
Setting Up Your Airbrush for Lexan RC Body Painting
The airbrush is the professional's tool of choice for Lexan bodies because it offers full control over spray width, paint volume, and air pressure simultaneously. Here is how to set up your airbrush system specifically for polycarbonate painting.
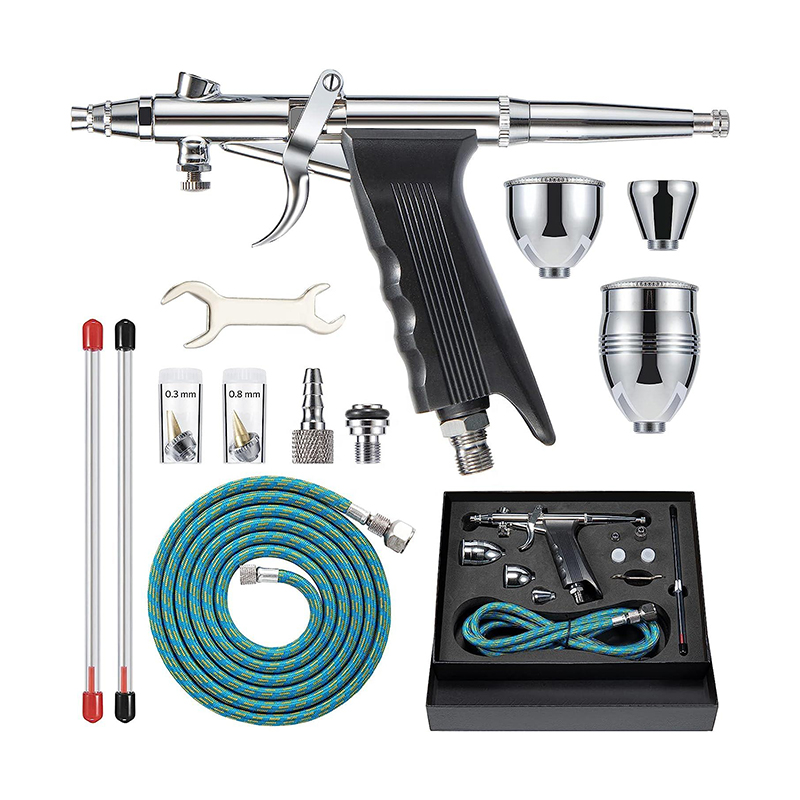
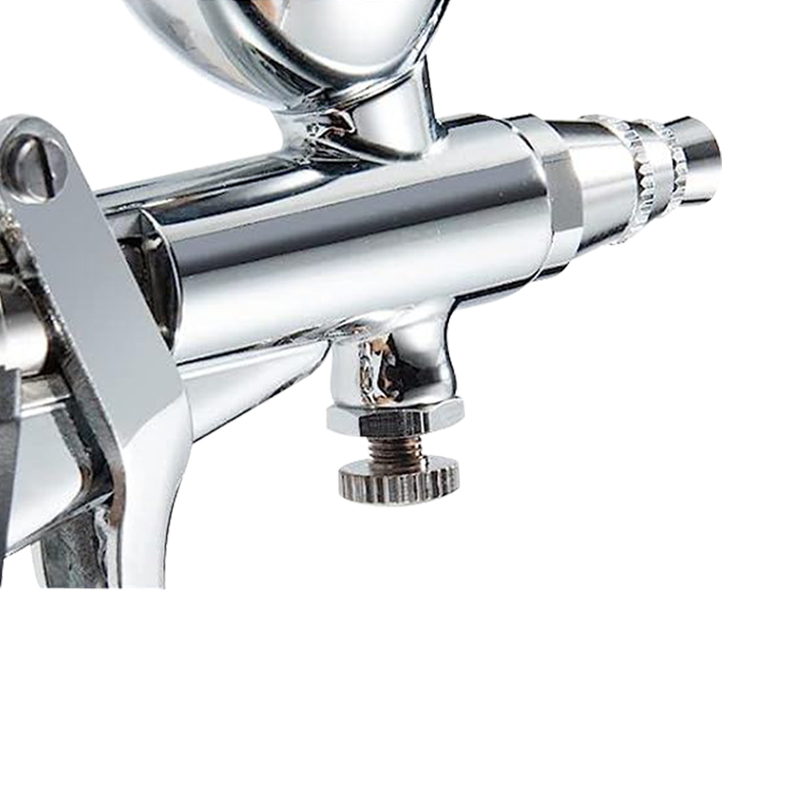
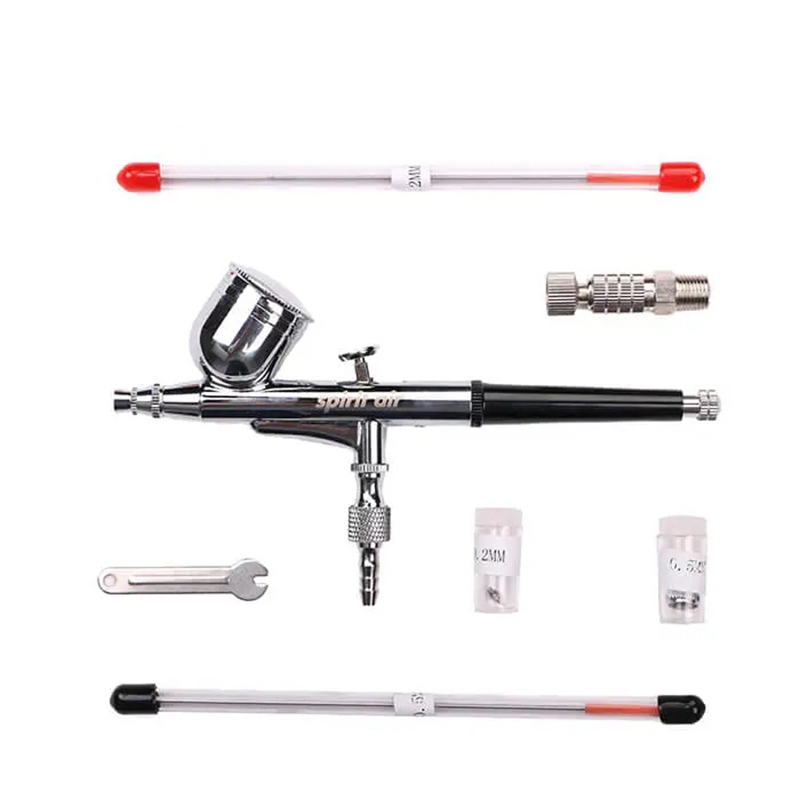
Choosing the Right Airbrush Type
For Lexan painting, a dual-action gravity-feed airbrush with a 0.3mm or 0.5mm nozzle is the most versatile setup. Dual-action means you control air with the trigger press and paint volume by pulling back — this gives you both fine detail lines and broad coverage without switching tools. A 0.3mm nozzle handles detail work and fades beautifully. A 0.5mm nozzle covers large areas faster and is excellent for applying backing coats. Some experienced painters own both and switch between them.
- Iwata Eclipse HP-CS — a reliable mid-range option used by many RC painters
- Badger Patriot 105 — robust, easy to clean, excellent for beginners
- Harder & Steenbeck Evolution — premium choice for detailed show bodies
Compressor Requirements
A small tankless or tank compressor delivering 15–30 PSI is sufficient for most Lexan painting. Polycarbonate-specific paints like Tamiya PS series are designed to be sprayed at relatively low pressure (12–18 PSI) to avoid overspray and orange-peel texture. For Createx or waterbased acrylics thinned for airbrush use, 20–25 PSI works well. A moisture trap is strongly recommended — water droplets in the airline cause paint spattering and fisheye defects that ruin smooth gradients.
- Master Airbrush TC-20 — silent, tankless, good for hobby use
- California Air Tools 2010A — quiet tank compressor, very stable pressure
- Always add an inline moisture trap regardless of compressor type
Paint Thinning for Airbrush Use
Tamiya PS paints come ready to spray from the can for rattle-can use, but if you decant them into your airbrush cup, they typically need thinning by about 10–20% with Tamiya lacquer thinner to achieve the right viscosity. Createx waterbased paints for airbrush use should be thinned with Createx 4011 reducer or distilled water to a consistency described as "skim milk" — thin enough to flow freely but not so watery that coverage suffers. Always do a test spray on a scrap piece of Lexan first. If you see dry overspray texture rather than a smooth film, the paint is too thick or the pressure too low. If it runs instantly, it is over-thinned.
Cleaning Your Airbrush Between Colors
Thorough cleaning between colors is non-negotiable. For lacquer-based paints like Tamiya PS decanted into an airbrush, flush with lacquer thinner until the airstream runs clear, then follow with a second flush. For waterbase paints like Createx, plain water followed by a dedicated airbrush cleaner works well. A partially blocked nozzle will cause spitting and uneven spray patterns — a common frustration among beginners that is almost always caused by inadequate cleaning rather than equipment failure. Disassemble and ultrasonic-clean your airbrush every 5–10 uses for best results.
Surface Preparation: The Step Most Painters Skip
The interior surface of a new Lexan body is coated with a thin protective film and often has mold-release residue from manufacturing. Neither is visible to the naked eye, but both cause paint adhesion failure — paint that beads up, fisheyes, or peels away in sheets days after painting. Taking 10 minutes to prep the surface properly prevents hours of frustration.
- Remove the protective film. New Lexan bodies come with a blue or clear protective film on the outer surface. Leave this on during the entire painting process — it protects the outer surface from accidental scratches and paint contamination. Do not remove it until the body is fully painted, decaled, and ready to mount.
- Wash the interior with dish soap. Use warm water and a few drops of dish soap (Dawn or similar degreasing soap). Rinse thoroughly with clean water and let the body air dry completely — at least 30 minutes at room temperature.
- Wipe down with isopropyl alcohol. 90%+ isopropyl alcohol on a lint-free cloth removes any remaining oils, fingerprints, and residues. Work from the center outward and use fresh sections of cloth to avoid redepositing contamination.
- Scuff with 600–800 grit wet/dry paper (optional but recommended). A light scuff with fine wet/dry sandpaper slightly textures the surface and dramatically improves paint mechanical adhesion. Keep the pressure very light and work in small circular motions. This step is especially important when using Createx or other non-Lexan-specific paints.
- Final wipe with tack cloth or microfiber. Remove all sanding dust before painting. Any dust particles under the paint layer will show as bumps in the final finish.
Masking Strategies for Sharp Lines and Complex Designs
Masking is where RC body designs go from ordinary to extraordinary. Whether you are painting a simple two-tone design or a full race livery with multiple colors, your masking technique determines the sharpness and cleanliness of every edge. Poor masking is the number-one cause of bleeding, fuzzy lines, and color contamination.
Tamiya Masking Tape
Tamiya masking tape in 6mm and 10mm widths is the gold standard for RC body work. It is thin enough to follow curves precisely, leaves no residue, and seals tightly enough to prevent paint bleed. For straight lines and gentle curves, apply the tape in a single smooth stroke. For tight curves, use multiple overlapping short strips of the 6mm width — this allows the tape to follow curves without lifting or kinking. Press all tape edges down firmly with a fingernail or burnishing tool before spraying.
Using the Airbrush for Soft Mask Fades
One of the airbrush's greatest advantages over spray cans is the ability to create soft-edge transitions without any masking at all. By keeping the airbrush farther from the surface (3–5 inches instead of 1–2 inches) and reducing pressure slightly, the paint atomizes into a wide, soft cloud that creates natural-looking gradient fades. This technique is used extensively in flame effects, ghost graphics, and color-to-color transitions in professional RC body painting. Practice on a scrap piece until you can consistently control the fade width.
Vinyl Stencils and Window Masks
Pre-cut vinyl stencils, available from specialty RC body paint suppliers like Protoform and T-Works, allow complex repeating shapes like flames, stars, carbon fiber patterns, and tribal graphics to be applied quickly and repeatably. These work best with an airbrush because the spray can be directed precisely within the stencil opening. Window masking — covering the clear window areas with tape before painting — should always be done before any paint is applied and removed only after all paint has fully cured.
The Trick for Perfect Mask Edges
Before removing masking tape after painting, score along the tape edge with a sharp hobby knife or scalpel. This severs the paint film cleanly at the tape edge and prevents the paint from lifting when the tape is pulled. Pull tape back at a 180-degree angle — doubling it back over itself — rather than pulling straight up. This dramatically reduces the risk of chipping the paint layer. Always wait until paint is fully dry before removing masks.
The Correct Paint Layering Order for Lexan Bodies
Getting the layer sequence right is absolutely critical because, as discussed earlier, you are painting the inside and viewing from the outside. Every decision you make about layer order determines what the finished body looks like from the correct viewing angle.
Step 1
Detail Work and Outlines
Apply thin black lines, panel outlines, detail shading, and any fine graphic elements first. These will appear on top when viewing from outside. Use a 0.3mm airbrush nozzle at 10–15 PSI for lines as thin as 0.5mm.
Step 2
Candy Colors and Special Effects
Candy paints, pearls, metalflake, and transparent colors require a silver or chrome base coat applied first (which actually goes on second in your sequence), then the candy color over it. Apply these special-effect layers before your solid primary colors.
Step 3
Primary Colors and Graphics
Apply your main body colors, logos, flames, or graphic elements. These form the visual core of the design. Use masking tape to achieve clean transitions between colors.
Step 4
White Backing Coat
A white backing coat is applied last and acts as a light reflector, dramatically brightening all the colors in front of it. This step is especially important for neon and fluorescent colors. Use 2–3 thin coats rather than one thick coat to avoid runs.
Some designs omit the white backing coat and instead use a dark backing for a more muted, realistic appearance. Race cars and military vehicles often look better with a black or dark gray backing coat. Experiment with both on scrap Lexan to see which effect suits your design.
Airbrush Techniques Specific to RC Lexan Body Painting
Owning an airbrush is one thing — knowing how to use it for the specific demands of Lexan painting is another. These are the techniques that separate a basic paint job from a show-quality finish.
The Dagger Stroke for Flames and Feathers
The dagger stroke is a fundamental airbrush technique where you start with the trigger fully pressed (maximum paint and air) and gradually release the paint trigger as you move across the surface, ending in a fine point. On Lexan, this creates the classic tapered flame tip effect. Start practicing on paper — consistent dagger strokes require 30–60 minutes of focused practice but become natural quickly. Keep the airbrush moving at a consistent speed for even taper.
Freehand Gradients and Fades
Fade effects — where one color transitions smoothly into another — are extremely popular on touring car and buggy bodies. The technique involves: applying the first color solidly in one area, then reducing pressure and increasing distance from the surface as you approach the transition zone, and then repeating the same approach from the other direction with the second color. Overlapping the two color clouds in the transition zone creates a natural blend. Thin, transparent paint layers work far better than thick opaque ones for gradient work — aim for 4–6 light passes rather than 1–2 heavy ones.
Chrome and Mirror Effects
True chrome effects require Alclad II Aqua Chrome or similar ultra-metallic paints. These are extremely sensitive to surface preparation — any texture or contamination will destroy the mirror effect. The surface must be perfectly smooth, thoroughly cleaned, and sealed with a gloss black base coat before the chrome is applied. The chrome layer itself is applied in very thin, barely-there mists from 6–8 inches away. Rushing this technique or applying too much paint in one pass will dull the mirror finish to a matte silver.
Carbon Fiber Texture with Airbrush
Carbon fiber patterns on Lexan bodies are achievable with an airbrush and a mesh stencil. Cut a piece of window screen or purchase a dedicated carbon fiber mask, hold it approximately 1–2mm above the surface, and mist dark paint (usually dark gray or black) over a lighter base color. Rotate the stencil 90 degrees and apply a second mist pass — this creates the characteristic woven appearance. A final candy coat in dark blue or dark gray over the carbon fiber pattern adds depth and realism.
Controlling Overspray
Overspray — unwanted paint landing outside the intended area — is the most common airbrush problem on Lexan bodies. Causes include pressure too high, paint too thin, airbrush held too far from the surface, or paint not fully thinned. Solutions: reduce air pressure to 12–18 PSI for detail work, thin paint to the right consistency, and keep the airbrush no more than 2–3 inches from the surface when spraying details. A piece of scrap cardboard held at the edge of a painted area can block overspray from contaminating previously painted zones.
Common Mistakes and How to Fix or Avoid Them
Even experienced RC painters run into problems. Here is a reference table of the most common issues, their causes, and solutions:
| Problem |
Likely Cause |
Solution |
| Paint crazing/cracking |
Wrong paint type (solvent attack) |
Use only polycarbonate-safe paints |
| Paint peeling after drying |
Contaminated surface, oil/mold release |
Clean with IPA before painting |
| Fuzzy/bleeding edges at mask |
Tape not sealed, pressure too high |
Burnish tape edges; reduce PSI |
| Airbrush spitting paint |
Dried paint in nozzle, dirty airbrush |
Clean airbrush thoroughly between sessions |
| Colors look dark/muddy |
Missing white backing coat |
Always apply white backing last |
| Orange peel texture |
Paint too thick, PSI too low |
Thin paint more; increase pressure slightly |
| Paint chips at flex points |
Non-flexible paint, too many thick coats |
Use Lexan-specific paint; use thin coats |
Common Lexan RC body painting problems and their solutions
Finishing, Decals, and Final Steps
Once all paint layers are applied and fully cured — typically 24–48 hours at room temperature for lacquer-based paints and 12–24 hours for waterbase paints — you can move to finishing steps.
Applying Decals and Stickers
Decals and sponsor stickers are applied to the outside of the Lexan body, over the protective film that you have been leaving on throughout the painting process. Wait until all paint is fully cured before removing the protective film. When you peel the film, the outer surface will be perfectly clean and unscratched. Apply decals to a clean, dry surface for best adhesion. Avoid touching the adhesive side with bare fingers — oils from skin degrade adhesion over time.
Trimming the Body
Lexan bodies require trimming along the body lines before mounting. Use sharp body scissors (Tamiya, Excel, or similar curved-blade scissors designed for Lexan) rather than standard scissors. Score-and-snap is an alternative: use a hobby knife to score the cut line 4–5 times, then snap along the score. Sharp tools prevent cracking and tearing at cut edges. After trimming, smooth rough edges with fine sandpaper or a Dremel rotary tool with a sanding drum.
Body Mounts and Post Holes
Mark body post hole locations from inside the body using a body reamer tool, which creates a clean hole without cracking the Lexan. Never use a drill bit directly — it catches and tears the polycarbonate. A body reamer punches through by rotating pressure, leaving a clean, round hole. Cut the holes slightly smaller than needed first, then enlarge them with the reamer until the body posts fit snugly without stress on the shell.
Window Tinting
Window tinting — applying a dark or lightly tinted coating to the clear window areas — is popular for aesthetic effect. On Lexan bodies, this is done with light mist coats of translucent paint (Tamiya PS-31 Smoke or Pactra Smoke are popular choices) applied to the inside of the window area, over the protective film already removed from that specific area. 2–3 very thin passes creates a convincing dark tint. Be careful not to apply too much — heavy tinting obscures the interior detail of the chassis and looks unrealistic.
Recommended Paints for Airbrush Use on Lexan RC Bodies
Paint selection makes a massive difference in both the painting process and the longevity of the finished body. These are the most widely trusted options among serious RC body painters:
- Tamiya PS Series (Polycarbonate Spray): The most popular Lexan paint worldwide. Available in spray cans but can be decanted for airbrush use with Tamiya lacquer thinner. Excellent color selection, superb adhesion, and reliable flexibility. Over 60 colors available.
- Parma Faskolor: A waterbase acrylic specifically formulated for Lexan. Exceptional flexibility, safe for airbrush use at 20–25 PSI, cleans up with water. Available in standard and fluorescent ranges. Particularly popular in oval racing classes.
- Pactra Lexan Paints: Long-established formula with reliable Lexan adhesion. The candy and metallic ranges from Pactra are particularly well-regarded for their depth and vibrancy. Mix with Pactra reducer for airbrush use.
- Createx Colors (Airbrush): Not designed specifically for Lexan, but widely used with excellent results when a scuff coat is applied first. The Illustration Colors and Wicked series offer extraordinary color range and blendability. Use Createx 4011 reducer for proper viscosity.
- Alclad II Aqua Series: For chrome, polished metals, and extreme metallic effects. Requires a sealed gloss black base, then ultra-thin chrome coats applied with a fine-nozzle airbrush. Not flexible enough for daily use bodies — best for show or display builds.
Pro Tips from Experienced RC Body Painters
These are the insights that come from years of painting and making all the common mistakes first:
01
Always test paint compatibility on scrap Lexan before painting your shell. A 5-minute test saves a $30 body.
02
Take photos of your masking layout before removing any tape. You will thank yourself during the next color stage.
03
Paint in a warm room (above 65°F / 18°C). Cold temperatures cause paint to thicken and dry slowly, increasing run risk.
04
Let each color layer dry completely — at least 30 minutes for lacquers — before applying the next. Rushing causes solvent trapping and cloudy finishes.
05
Use a light source held against the outside of the body while painting inside. It helps you see color coverage and spot thin areas before they become problems.
06
Thin your airbrush paints to the consistency of whole milk for coverage coats and skim milk for fade work. Consistency of the paint mix matters more than any other single variable.
 English
 русский