English
 русский
Jun 22,2026
Content
- 1 The Direct Answer: What Actually Creates Sharp Lines with an Airbrush
- 2 Understanding Why Lines Blur in the First Place
- 3 Airbrush Setup: Choosing the Right Equipment for Sharp Lines
- 4 Freehand Technique: How to Draw Sharp Lines Without Masking
- 5 Masking Methods: The Fastest Route to Perfectly Sharp Lines
- 6 PSI Settings Guide for Sharp Lines Across Different Applications
- 7 Common Mistakes That Ruin Sharp Lines — and How to Fix Them
- 8 Practice Drills That Build Sharp-Line Skills Quickly
- 9 Paint Types and Their Impact on Line Sharpness
- 10 Maintaining Your Airbrush for Consistent Line Quality
- 11 Advanced Techniques Used by Professional Airbrush Artists
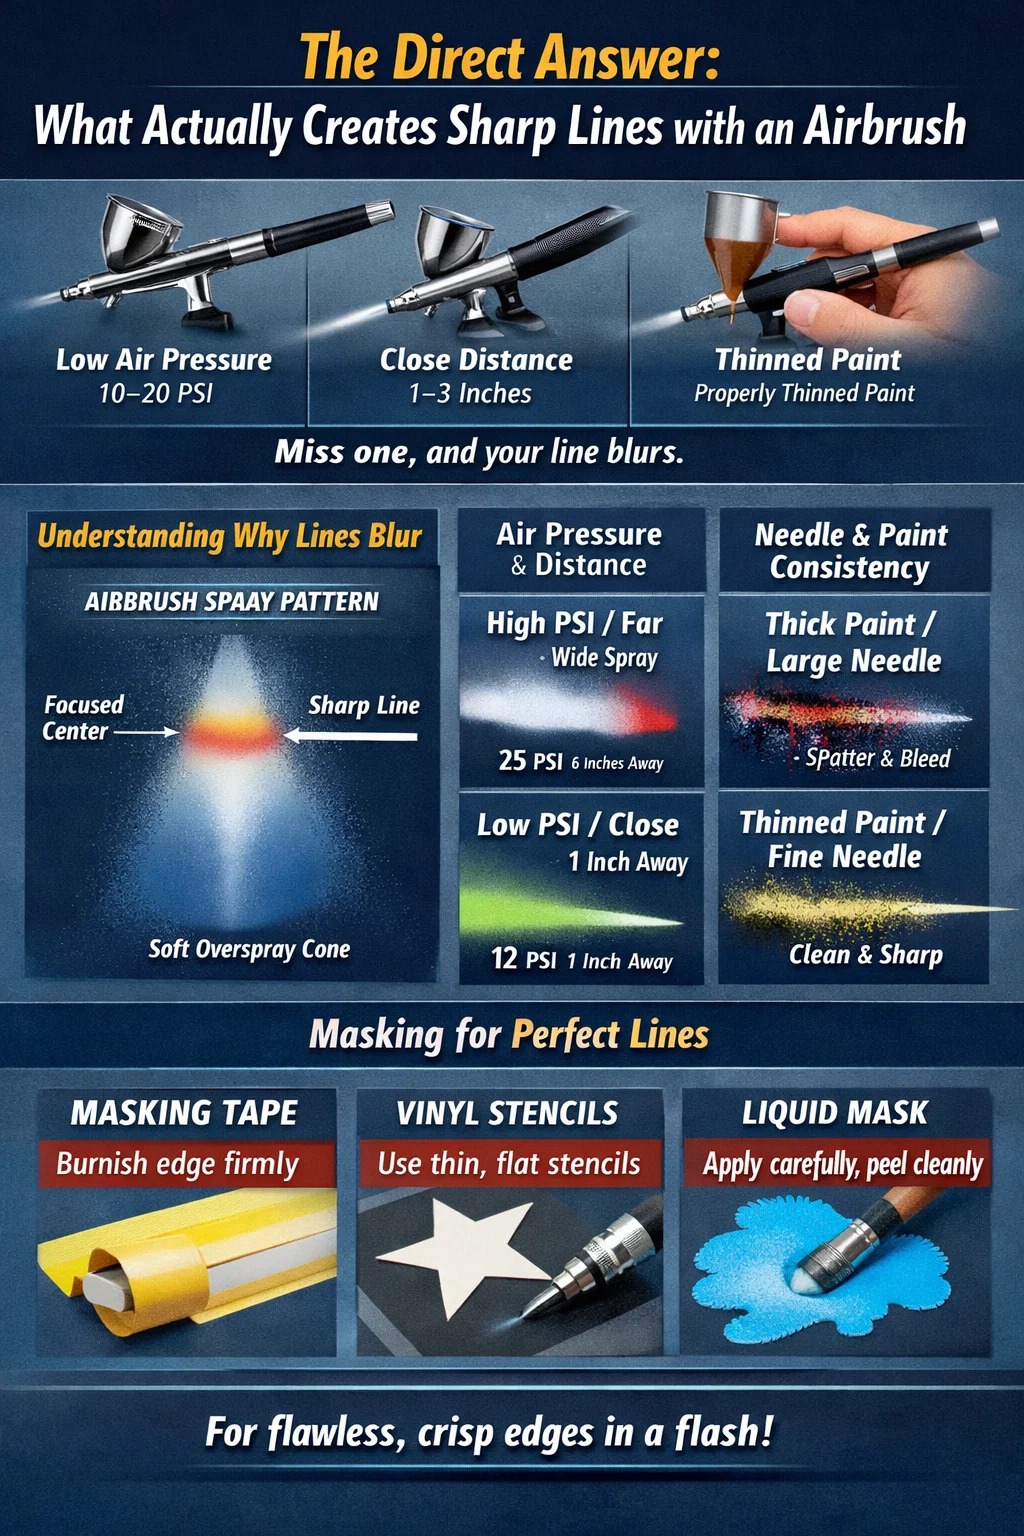
The Direct Answer: What Actually Creates Sharp Lines with an Airbrush
Sharp lines with an airbrush come down to four core variables working together: low air pressure (typically 10–20 PSI), a close working distance (1–3 inches from the surface), properly thinned paint, and deliberate trigger control. Miss even one of these, and your line softens, bleeds, or splatters. Most beginners struggle because they work too far from the surface and use too much pressure — two habits that kill precision immediately.
Freehand sharp lines are achievable with practice, but physical masking and stencils remain the fastest and most reliable method for clean, crisp edges — especially on detailed miniatures, automotive panels, or scale models. Both methods are valid; what matters is knowing when to use each.
Understanding Why Lines Blur in the First Place
Before fixing the problem, it helps to understand the mechanics. An airbrush atomizes paint into a cone-shaped spray pattern. At the center of that cone, paint concentration is highest; at the edges, it feathers out. That feathering is what creates soft transitions — beautiful for blending, destructive for defined lines.
The width of the spray cone expands with distance. At 6 inches, even a fine needle airbrush like the Iwata HP-CS produces a spray pattern over an inch wide. Pull back to 2 inches, and that same airbrush can produce a line under 2mm. Distance is arguably the single most controllable variable a painter has.
The Role of Air Pressure in Line Definition
High PSI doesn't just widen the spray — it also increases overspray and blowback, which scatter paint particles outside your intended line. For fine lines, most experienced airbrush users work between 10 and 18 PSI. Some miniature painters drop even lower, to 6–8 PSI, when doing hairline detail work. The trade-off at very low PSI is that paint flow becomes inconsistent if the paint isn't thinned enough, so both variables must be balanced together.
Paint Viscosity and Its Effect on Edge Sharpness
Thick paint doesn't atomize cleanly. It produces a spattered, uneven spray with large droplets that bleed under masks and ruin edges. As a rough benchmark, paint thinned to a skim-milk consistency (roughly 1:1 to 1:1.5 paint-to-thinner ratio for acrylics, depending on the brand) atomizes well at low PSI and leaves a defined deposit without flooding the surface. Lacquers and enamels generally need less thinning than acrylics due to their lower surface tension.
Airbrush Setup: Choosing the Right Equipment for Sharp Lines
Not all airbrushes are equal when it comes to line precision. Equipment choices have a direct and measurable impact on what's achievable.
Needle Size Matters More Than Most Realize
Needle and nozzle size determine the minimum line width an airbrush can produce. Common sizes:
| Needle Size | Typical Use Case | Minimum Line Width |
|---|---|---|
| 0.15 mm | Micro detail, fine lines | ~0.5 mm |
| 0.2 mm | Detail work, miniatures | ~0.8 mm |
| 0.3 mm | General purpose, medium detail | ~1.5 mm |
| 0.5 mm | Base coating, large areas | ~3 mm+ |
For sharp lines in detail work, a 0.2 mm or 0.3 mm needle is the standard choice. A 0.15 mm needle delivers finer results but clogs more easily and requires perfectly thinned paint. For most users, 0.2–0.3 mm hits the right balance.
Double-Action vs. Single-Action for Line Control
A double-action airbrush lets you control air and paint independently with one finger — pushing down for air, pulling back for paint. This control is essential for creating precise lines because you can start and stop the paint mid-stroke without releasing air, which prevents spattering at the beginning and end of a line. Single-action airbrushes fix the paint-to-air ratio, making fine line control significantly harder. For sharp work, a gravity-feed, double-action airbrush is the tool of choice among professionals.
Freehand Technique: How to Draw Sharp Lines Without Masking
Freehand sharp lines are a skill that takes deliberate practice to develop, but the mechanics are learnable. The following technique breakdown applies to most airbrush applications, from model painting to illustration.
Working Distance and Speed
Hold the airbrush 1 to 3 inches from the surface for fine lines. Move your entire arm, not just your wrist — wrist movement creates arcing lines that widen and narrow unpredictably. Stroke speed should be consistent; slowing down mid-line deposits more paint, creating a thick spot. Practice consistent speed by drawing parallel lines on scrap paper until the movement feels automatic.
Trigger Control: The Pre-spray Trick
One of the most effective techniques for eliminating blobs at line starts is the pre-spray method: before your airbrush tip reaches the surface area where you want the line, begin spraying off to the side or on a scrap piece. This purges any accumulated paint at the needle tip and establishes a steady flow before the stroke begins. End the line the same way — release paint before you release air, and trail off the edge of your working area rather than stopping mid-surface.
The Needle Choke Technique
Some airbrush artists use a needle choke — holding their index finger lightly at the front of the airbrush near the needle cap — to limit the needle's backward movement. This physically restricts how much paint can flow, keeping the spray extremely fine. It's a manual override that experienced painters use when extreme precision is needed and they don't want to re-adjust their needle stop screw constantly.
Reducing Overspray with Paint Consistency
Overspray — fine mist that lands outside your intended line — is partially a pressure issue but also a paint issue. Paint that is too thin becomes mist-like and drifts. Slightly thicker paint (still fully atomizable, but not watery) deposits more precisely because the particles are heavier and travel less distance beyond the spray cone's center. Finding this balance requires testing on paper before working on your actual piece.
Masking Methods: The Fastest Route to Perfectly Sharp Lines
Physical masking removes the freehand skill requirement entirely and produces edges that are geometrically precise. There are several masking approaches, each suited to different applications.
Masking Tape: The Standard Method
Low-tack masking tape (such as Tamiya tape, which is widely used in scale modeling) conforms well to surfaces without leaving adhesive residue. The critical step most beginners skip: burnish the tape edge firmly with a fingernail or a soft tool before airbrushing. Any gap between tape and surface allows paint to bleed under, creating a fuzzy edge. Applying thin coats rather than a heavy single coat also reduces bleeding — wet paint is more likely to migrate under the tape than multiple thin, dry layers.
Liquid Masking Fluid
Liquid masking fluid (such as Vallejo Masking Fluid or Winsor & Newton Art Masking Fluid) is applied with a brush, dries to a flexible rubbery film, and peels off after painting. It's ideal for complex organic shapes where tape can't conform — faces, natural textures, irregular borders. The edge quality depends entirely on how carefully the fluid is applied; a fine brush gives you a precise edge, a wide brush gives you a rough one. Allow the fluid to dry completely before airbrushing — partially dried masking fluid smears and ruins edges.
Vinyl and Mylar Stencils
Pre-cut stencils, especially those cut from thin vinyl or Mylar with a cutting plotter, produce consistently sharp, repeatable edges. The key variable is stencil thickness — thinner stencils lay flatter against the surface and produce sharper edges. Thicker stencils create a gap between the stencil edge and the surface, allowing paint to bleed under and soften the line. Stencil thickness under 0.1 mm (100 microns) is considered ideal for fine airbrush work.
When using any stencil, spray at a slight inward angle — pointing the airbrush toward the center of the stencil opening rather than parallel to the surface — to minimize paint riding under the edge.
Torn Paper and Hard Edge Masking
A torn strip of paper held just above the surface (not touching it) creates a soft-hard edge — harder than pure freehand, softer than tape. Adjusting the gap between paper and surface changes how soft or sharp the edge is. This technique is widely used in automotive airbrushing and t-shirt art where a slightly organic-feeling line is preferred over a mechanically perfect one.
PSI Settings Guide for Sharp Lines Across Different Applications
Pressure requirements vary by surface type, paint type, and detail level. The following ranges reflect common practice among experienced airbrush users:
- Miniature painting (fine detail): 6–15 PSI with a 0.2 mm needle
- Scale model panel lines: 10–18 PSI with a 0.3 mm needle
- Illustration and fine art lines: 12–20 PSI with a 0.2–0.3 mm needle
- Automotive pinstriping with airbrush: 15–25 PSI with a 0.3–0.5 mm needle
- T-shirt and fabric airbrushing: 20–30 PSI (fabric requires more pressure to penetrate fibers)
These are starting points, not rules. Always dial in on a test surface before touching your final piece. A single test run on paper or scrap material takes two minutes and prevents hours of repair work.
Common Mistakes That Ruin Sharp Lines — and How to Fix Them
Paint Bleeding Under Masks
The most frequent masking problem. Causes: tape not burnished, paint applied too wet, or surface texture creating gaps under the tape. Fixes: press tape edges firmly, apply thin dry-ish coats, and seal the tape edge with a thin clear coat or the base color before applying the contrast color (a technique called "sealing the mask" — the base color fills any micro-gaps, and the new color can't bleed through).
Lines That Widen in the Middle
This happens when hand speed slows mid-stroke. The airbrush dwells longer in one spot, depositing more paint and widening the line. Practice maintaining consistent arm speed by drawing repeated parallel lines on paper. Some painters use a metronome or count silently to maintain rhythm during long strokes.
Spatter at the Start of a Line
Paint accumulates at the needle tip between strokes, especially with thicker paint. When the trigger is pulled, that accumulated paint releases as a blob. Solutions: pre-spray off the surface before starting each stroke, keep paint properly thinned, and clean the needle tip with a soft cloth dipped in thinner between sessions.
Overspray Fogging the Edge
Visible mist landing beyond the intended line, creating a soft haze around the edge. Causes: pressure too high, paint too thin, or working too far from the surface. Reduce pressure, thicken paint slightly, move closer, and ensure adequate ventilation isn't blowing overspray back onto the surface.
Inconsistent Line Width
Variable distance from the surface is usually the culprit. This is a physical control issue that improves with practice. Using a physical rest or brace (resting the little finger on the surface or using a mahl stick) helps stabilize hand distance and produces more consistent results.
Practice Drills That Build Sharp-Line Skills Quickly
Deliberate practice on specific exercises builds muscle memory faster than working on actual projects. The following drills are used by professional airbrush instructors:
- Straight lines across paper: Fill a sheet with parallel horizontal lines, keeping them as consistent in width and spacing as possible. Aim for lines under 1 mm wide. Do this daily for a week and the improvement is dramatic.
- Dagger strokes: Start a stroke at full spray width and taper it to a point by pulling the airbrush away from the surface at the end. This builds simultaneous control of distance and speed.
- Dot control: Produce single dots of consistent size, spaced evenly. Controlling the size of a dot — which requires precise trigger pull depth and exact distance — is one of the most demanding airbrush exercises and accelerates overall control.
- Circle outlines: Paint circles of consistent thickness using arm rotation. This is particularly relevant for panel lining on models and vehicles.
- Lined grids: Draw a printed grid in pencil and attempt to follow each line precisely with the airbrush. This is a direct simulation of the type of control needed for panel line work.
15 minutes of focused drill practice per session builds control faster than spending two hours on a project where most of the work is broader coverage.
Paint Types and Their Impact on Line Sharpness
Not all paints behave equally through an airbrush, and the type of paint affects how sharp a line you can achieve.
Acrylics
The most common airbrush medium. Water-based acrylics (Vallejo, Createx, Liquitex, Golden) vary in their flow properties. Some brands (notably Vallejo Model Air) are pre-thinned for airbrush use; others require thinning. Acrylics dry quickly, which means paint at the needle tip can partially dry between strokes, causing clogs and tip buildup. Keep a damp cloth nearby to wipe the needle tip regularly. High-flow acrylics (like Golden High Flow) are particularly well-suited for fine-line airbrushing due to their low viscosity and strong pigmentation.
Enamels
Enamel paints have a longer open time than acrylics, reducing tip-dry issues during extended sessions. They also have excellent flow and produce very smooth, consistent lines. However, they require mineral spirits or dedicated enamel thinners rather than water, and the fumes require proper ventilation. Enamels are widely used in scale modeling for precise panel lines and detail shading.
Lacquers
Lacquer-based paints (Mr. Color, Tamiya Lacquer) are the choice of many experienced modelers for their fast drying time, exceptional color depth, and resistance to reworking. They atomize extremely finely and produce some of the sharpest possible edges when properly thinned. The aggressive solvents require a respirator, not just a dust mask. Lacquers are the professional standard for fine-line automotive and scale model airbrushing precisely because of their superior atomization at low PSI.
Maintaining Your Airbrush for Consistent Line Quality
A poorly maintained airbrush cannot produce sharp lines regardless of technique. Even minor contamination of the needle or nozzle causes irregular spray patterns that destroy fine detail work.
Needle Condition
A bent or blunted needle produces a lopsided spray pattern — the line won't be symmetrical and the spray cone will skew to one side. Inspect the needle tip under magnification before any detail session. Even a needle that looks straight to the naked eye can have a microscopic bend that ruins fine-line work. Replace needles that show any visible deformation. Iwata and Harder & Steenbeck needles typically run $8–20 USD and are worth replacing rather than attempting to straighten.
Nozzle Cleaning
Dried paint residue inside the nozzle restricts flow and causes spitting. Clean the nozzle after every session by soaking it in the appropriate solvent and using a nozzle reamer (a fine wire tool included with many airbrush cleaning kits) to remove any deposits. Avoid pipe cleaners inside the nozzle — they abrade the interior and over time damage the precision fit between needle and nozzle that creates a fine spray.
Nozzle Seal and Air Flow
A leaking nozzle seal allows air to escape around the nozzle head, disrupting the spray pattern and reducing the precision of the air cap. If you notice erratic spray despite clean parts and good paint consistency, check the nozzle seal — these small O-rings or teflon seals degrade over time and require periodic replacement. Replacement seals for most major airbrush brands cost under $5.
Advanced Techniques Used by Professional Airbrush Artists
Frisket Film for Complex Shapes
Frisket film is a low-tack, transparent adhesive film cut to shape with a craft knife directly on the surface. It conforms perfectly to the work surface, leaves no gap, and produces machine-perfect edges. It's the standard tool in illustration airbrushing and photo-retouching work. The limitation is that cutting on the surface can damage softer substrates — use a light touch and change blades frequently to avoid scoring.
Reducing Agent vs. Water for Acrylics
Many professional airbrush artists thin acrylics with a dedicated airbrush medium or reducer rather than plain water. Reducers slow drying time (reducing tip-dry), maintain binder integrity (water can over-thin and break the acrylic binder, causing adhesion failures), and often contain flow improvers that help the paint atomize more evenly. Vallejo Airbrush Thinner, Liquitex Airbrush Medium, and Createx 4012 Reducer are three widely used products that improve fine-line atomization compared to water thinning.
Multiple Thin Passes vs. Single Thick Pass
A single heavy coat floods the line, spreads into the surrounding area, and bleeds under masks. Two to four thin passes, each allowed to partially dry before the next, builds to full color coverage while keeping edges crisp. Each thin coat deposits less paint per application, meaning less paint is available to migrate. This approach takes longer but produces noticeably sharper results in every application.
Scaling Down for Miniature and Fine Detail Work
When working on very small subjects — 28mm miniatures, fine jewelry painting, or intricate illustration — the standard rules are pushed to their limits. Experienced miniature painters often work at 8–12 PSI with a 0.2 mm needle, holding the airbrush 0.5 to 1 inch from the surface. At this scale, even minor inconsistencies in paint thickness, needle condition, or hand movement are visible. Many painters use a magnifying lens or headband magnifier to see the work clearly at this scale, which directly improves the precision of each stroke.