English
 русский
Jun 22,2026
Content
The Verdict: Airbrushing with Acrylic Paint
Yes, you can absolutely use acrylic paint in an airbrush, and it is actually the most common medium used by hobbyists and professionals alike. However, you cannot simply pour heavy-body craft acrylics directly into the cup. To achieve a smooth, atomized mist, the paint must be properly thinned to a milky consistency and processed to ensure the pigment particles are fine enough to pass through the airbrush nozzle without causing immediate blockages.
Understanding Acrylic Paint Types for Airbrushing
Not all acrylics are created equal. The success of your airbrush session depends heavily on the specific grade of paint you select.
Airbrush-Ready Acrylics
Brands like Vallejo Model Air, Createx, and Badger Air-Opaque are pre-thinned. These contain pigments ground to less than 0.5 microns, allowing them to flow through nozzles as small as 0.15mm with ease. These are the "gold standard" for beginners who want to avoid the headache of mixing ratios.
Heavy Body and Craft Acrylics
These are thick and paste-like. While they are much cheaper, they require significant dilution—often up to 1 part paint to 3 or 4 parts thinner. If the pigment quality is low, the larger "chunks" of color will snag on the needle, leading to the dreaded "spitting" effect where the airbrush ejects large blobs of paint.
Acrylic Inks
Inks are an overlooked treasure for the airbrush. Since they are liquid-state and highly saturated, they require almost no thinning and provide vibrant, transparent layers that are perfect for shading and glazing.
The Science of Thinning Acrylics
Thinning is the most critical skill to master when using acrylics in an airbrush. It is not just about making the paint "watery"; it is about maintaining the bond of the paint so it actually sticks to the surface.
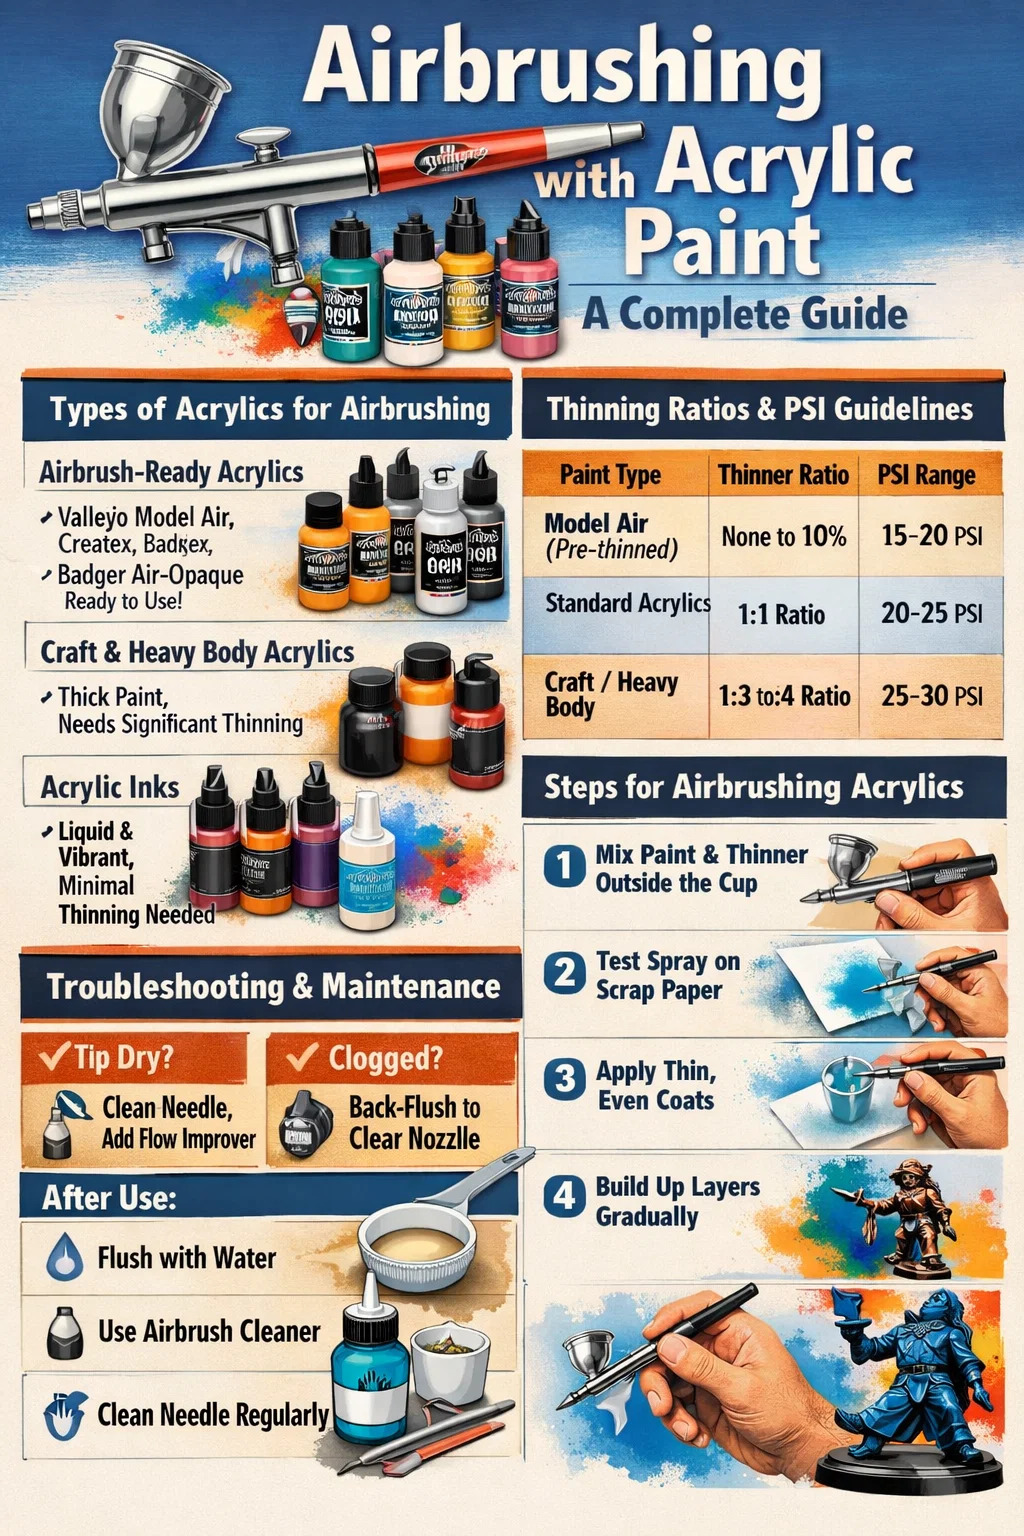
| Paint Category | Recommended Thinner Ratio | Typical PSI Range |
|---|---|---|
| Model Air / Pre-thinned | None to 10% Thinner | 15 - 20 PSI |
| Standard Model Color | 1:1 Ratio | 20 - 25 PSI |
| Craft / Heavy Body | 1:3 or 1:4 Ratio | 25 - 30 PSI |
Using distilled water is acceptable for basic thinning, but a dedicated Airbrush Thinner is superior. These thinners contain "flow improvers" and "retarders" that slow down the drying time. This is vital because acrylics dry by evaporation; without a retarder, the paint can dry on the needle tip before it even leaves the airbrush, a phenomenon known as "tip dry."
Step-by-Step Process for Airbrushing Acrylics
To get professional results on your first try, follow this sequence of operations.
- Stir, Don't Shake: Ensure your pigment is fully incorporated into the binder. Shaking can introduce air bubbles that cause the airbrush to stutter.
- Mix Outside the Cup: For beginners, it is best to mix paint and thinner in a separate small container. This ensures no unthinned "clumps" of paint sit at the bottom of the airbrush cup.
- Test the Flow: Spray onto a piece of cardboard or paper first. Check for "spider webbing" (too much pressure or too thin) or "orange peel" texture (paint too thick).
- Apply Thin Coats: Airbrushing is about building layers. It is better to apply three transparent coats than one heavy, wet coat that might run or obscure surface detail.
Troubleshooting Common Acrylic Issues
Even with the right paint, you might encounter technical hurdles. Solving them requires understanding the relationship between the airbrush, air pressure, and the acrylic medium.
Dealing with Tip Dry
Tip dry is the number one enemy of acrylic airbrushing. If you notice your spray pattern becoming erratic or stopping entirely, use a damp cotton swab or your fingernail to carefully remove the dried paint crust from the end of the needle. Adding two drops of "flow improver" to your cup can reduce this frequency by up to 50%.
Clogged Nozzles
If the airbrush refuses to spray even after cleaning the tip, you likely have a clog inside the nozzle. This often happens when using craft acrylics with large pigments. You will need to perform a "back-flush" by blocking the front of the airbrush with a cloth and pressing the trigger; this forces air back into the cup, dislodging the clog.
Maintenance After Using Acrylics
Acrylics dry into a plastic-like film that is waterproof once cured. This makes cleaning the airbrush immediately after use non-negotiable.
- Flush the cup with water until it runs clear.
- Use a dedicated Airbrush Cleaner (which contains surfactants and mild solvents) to break down the remaining acrylic resins.
- Periodically remove the needle and wipe it with cleaner to ensure no residue builds up in the internal seals of the airbrush.
A well-maintained airbrush using quality acrylics can last for years, providing a finish that is far superior to any traditional brush application.